
|
|
|
COBRA II
|
|
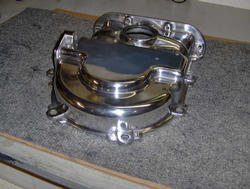
FE Timing Chain Cover
This is the factory aluminum timing chain cover off of the 390. I have approximately 15 hours of work on it. It would have been easier to get a chrome one, as personally, polishing aluminum is one of the most boring things you can possibly do- well, to me anyway...but by personal preference, I like polished aluminum more than chrome. Aluminum requires some up-keep unless it's clearcoated, but it will still look good in 5 years. The cheap Mr. Gasket type chrome pieces for engines is just not a quality chrome job. I plan to clearcoat it with Glisten PC, but will have to wait til Spring, when it's a bit warmer, as Glisten takes about four days to cure.
|
Brake Line Brackets
These are the brake line clamps I made to secure the smaller stainless steel brake lines to the frame. They are now done, and bolted in place. It ended up being more of a PITA than I thought they'd be, as I had to tweak them a bit to get them tight enough to hold the line in place, but not too tight where they'd crush the brake line. The bolts that hold the lines to the clamp will be replaced with stainless bolts, but these will work for now. |
|
|
|
The Toploader Is Done
Well, almost. I plan to replace the front and rear seals and swap the front bearing out for the more heavy duty version before putting it in the car. Now is the time to do it, as they are all easily reached with the transmission sitting on the bench. Other than that, I am not replacing anything as the inside really looks good. Even in the even of any problems after the Cobra is running, the toploader can be pretty easily removed. Theres no exhaust system to deal with, as the headers and sidepipes run to the sides of the car, and not around the transmission. I sat the transmission on the bellhousing just to see what it would look like, but with the toploader, I cannot use this particular bellhousing. It is 1/2" too long, so I will either find a regular FE bellhousing or go with an aftermarket scattershield for safety reasons. |
Ross #99601's...starting the engine build!
After trying to decide whether to start the engine build, or something else, I finally chose to start building the engine. My concern was the freshly built 390 sitting dormant on the engine stand for an extended period of time. I decided to go ahead and build the engine and set it down into the chassis. I am currently building a table type thing that will house a tachometer, oil pressure guage, and water temperature guage...that way I can start the engine every now and then without worrying about the engine sitting for too long. I am currently buying all the necessary items for the short block so I will have everything together to take to the machine shop. After considering many different brands, I opted for the Ross #99601's. Slightly overkill for my application, but if I ever decide to run nitrous on the Cobra, the pistons will be up to the task. I also liked the features of the Ross pistons, such as forced oiling to the wrist pins, and the overall design. Once I get the new harmonic balancer and cam bearings, it will be time to head to the machine shop. The block and crank will be hot tanked, crank turned (if necessary), block bored .030" over, new cam bearings installed, balancing, and a few other misc. things. |
|
|
|
Stock piston with the Ross piston
Here is the Ross piston beside the stock 390 piston. Notice the difference in overall height of the pistons. The compression height is basically the same, but the Ross is obviously shorter. I don't have a scale handy, especially one sensitive enough to weigh grams, but the Ross is noticeably lighter (552 grams). Also notice the oil hole for the wrist pin, and the "half moon" groove machined into it. Oil is fed through an angled hole just above the wrist pin, behind the oil ring. In this picture, you can also see what appears to be an extra ring land between the actual three rings.
|
A few engine parts
Well, imagine that: another change of plans. I decided to hold off awhile on taking the block, crank, etc., to the machine shop, si I could get a few more engine parts together. That way, when I get everything back, I can start assembling the engine- rather than having the short block on the engine stand for too long. Heres the Edelbrock Performer RPM manifold, timing chain, and water pump, along with ARP rod bolts, Powerforce harmonic balancer, Melling HV oil pump, and ARP oil pump drive shaft. After I get the Edelbrock heads, i'll take the parts to the machine shop. Basically then all i'll need is cam/lifters, push rods, head bolts, head/intake gaskets, and carb. |
|
|
|
Edelbrock water pump
I'm trying to resist temptations to polish the intake manifold, as again it's one of the most boring things I can think of. I still might polish it, but at this point I plan on just clear coating it to enable me to keep it somewhat clean after the car is running. I went ahead and started polishing the water pump (so now I have to finish the damn thing...LOL), as at least that way, theres something polished close to the timing chain cover. Seems kinda crazy to polish whats 90% hidden by the pump, then not polish what you see alot more of. |
Well, guess what?
Yep, I did it again. After pretty much deciding on not polishing the intake, next thing I know, I was calling Eastwood to order a manifold polishing kit. All in all, I have probably 14 hours or so into polishing it. After buffing it out, a few areas stood out that need a little more attention- I will hit those areas again with 200, 400, then 800 grit wetpaper before buffing the spots out. Even though theres a little more work to do, overall it's pretty close to being done. I also have a few areas to touch up on the water pump as well, but again, the worst of it is definately over with. It will look good with the polished timing chain cover, intake, water pump, and distributor against the dark Ford blue block. The only thing left to polish is the valve covers, which will be the pent-roof finned "COBRA 427" type. I plan to paint between the "fins", then polish the tops of the fins and sides of the valve covers. |
|
|
|
Scattershield
Mainly for safety reasons, I decided to ditch the factory cast iron bellhousing and go with the Lakewood scattershield. Although the engine is not assembled, I have temporarily installed the scattershield and transmission to the block. The drivetrain will be mocked up to locate the placement of motor mounts, transmission crossmember and mount, etc.. By that time, the body should be here so that I can once again assure everything is lined up. Once the body is aligned, it too will be mounted to the chassis, and eventually be removed after everything is correctly assembled- such as steering column, guages, pedal assembly, shifter, e-brake, rollbar, etc.. Once the body goes to the paint shop, it will be time to build the engine. I also plan on painting the scattershield silver. |
Checking fit
Before the block and transmission were mocked-up, I scrubbed the block down and hit it with the pressure washer. The block has not been machined yet, but I still dont want it rusting. So after blowing it off with the air nozzle, I wiped a light film of oil on the cylinder walls, lifter bores, mains/caps, and deck before giving it a light coat of Ford blue. The hot tank will take care of it when it goes to the machine shop. I then decided to check the fit of the March water pump pulley, the alternator bracket, etc.. |
|
|
|
Engine / transmission mock-up
The rebuilt Traction-Lok differential is installed, as is the rear axles. With the block bolted to the scattershield, and it bolted to the transmission, they are temporarily installed to figure out where to bolt everything down. The transmission mount / crossmember is bolted to the transmission, but the crossmember is not yet secured to the frame. I can center it up left to right, but the body will have to be in place to see where it needs to be for and aft. In addition, the transmission crossmember will need secured to the frame rails, with the carburetor baseplate on the intake manifold level with the frame rail. It's pretty wild to see the chassis setting on the ground rather than setting on jackstands, like it has for the past 12 months. The chassis will of course set lower once the body, complete engine, etc. is installed, and theres already not alot of room between the ground and the scattershield. But on a positive note, if I decide to go with the factory 5 QT oil pan, clearance should not be an issue. At any rate, Im just counting the days til the London Cobra Show, where I will pick up the body, along with the radiator and fuel tank. |
Another pic...
of the chassis after the transmission crossmember was bolted in. Not really alot more I can do to it until the gas tank and radiator arrive, other than replacing a few bolts with stainless ones and cleaning the chassis up a bit. One more thing is to put the weatherstripping type stuff on the top of the frame rails where the body will set on it. The body will then be centered up both fore and aft, and side to side, before being temporarily bolted to the frame. I plan to mount basically everything- such as windshield, dash, shifter, seats, hood and trunk latches, headlights, etc., then disassemble it before the body goes to paint. That way, it's basically a matter of just bolting everything back on, rather than trying to install something after it's painted. The wiring harness and carpet will have to be completed after the body is painted, but the idea is to get as much done as you can beforehand. |
|
|
|
The body is finally here
Heres right after unloading it and putting it on the chassis. One of my favorite angles, but it would look alot better if it was painted, had headlights, etc.. It does feel different though to be done with the chassis, as the body opens up a whole new ballgame. It is also starting to actually look like a car now. |
I know, I know...
The wheels and tires gotta go. It looks funny with the tires crammed up inside the fenderwells. They are being used just to move the car around. Basically, the front tires will be as wide as these rear tires (8"), and the rear tires will be 10" wide. Up to a 295/50 R50's will fit. As for the build at this stage, I am in the process of painting things like door hinges, radiator mounting brackets, fuel tank, etc., and then plan to center everything up and mount the body so the doors, hood, and trunk can be fitted, and the steering column can be installed. |
|
|


