
|
|
|
COBRA
The complete Cobra build will be documented, as I was able to start taking pics of it as soon as it showed up. Again, the build will take quite awhile, but as it happens, it will be featured here. There are still things that I am somewhat undecided on as for the build goes, but overall I have a pretty good idea of what it will be. |
|
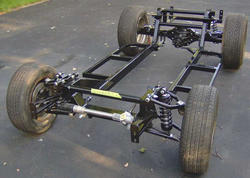
After all this time, finally a start!
The rolling chassis was ordered on February 17th, and was delivered at the London Cobra Show in London, Ohio on June 24th. This is minutes after arriving at it's new home and rolled off the trailer.
|
The chassis
Here you can see the 9" Ford rear end. The rear end was shortened and is of the 4-link variety- set up somewhat like Nascar. Also included was new shortened Moser axles. I am currently waiting for the rear disc brakes, as they come with a spacer that has to be pressed onto the axle before the axle bearings, then I can mount the axles and brakes. The coil over shocks are adjustable, which should make setting the ride height much easier. |
|
|
|
Control arms
Here you can see the tubular upper and lower control arms and the front coil overs. Front springs are 450# to support the Ford FE engine. Also barely visible is a new rack and pinion and spindles. The front end is based off a Mustang II, but utilizes 11" Granada rotors. |
Rear axle
Here you can see the polished aluminum radius rods with the coil overs. I was at first planning on a little steeper gear, but found the rear end has 3.45's already in it. The more I thought about it, especially with such a light car, I think the 3.45's will do just fine. When completed, if it's not what I was looking for, I can always change ratios then. |
|
|
|
Brake lines
I did not want to post a pic for each component, but before this stage- and basically the first thing I did was to dis assemble the front suspension and paint everything. The steering rack was polished in the center, and the ends painted with POR-15's Sterling Silver before being clearcoated with Glisten PC. The center of the rotors, the caliper adapter plates, and spindles were painted with POR-15 black. Sterling silver was also used on the calipers before they were clear coated. Everything was then reassembled. After that, I polished all the brake lines, sprayed them with POR-15 Metal-Prep (which somehow allows the clear coat to adhere to a polished surface) then clear coated them as well. The lines were ran, but I was somewhat leary of the brakeline so close to the header. I ended up covering the brake line with a piece of fuel hose, then covered it in corrugated tubing to make it a little easier on the eyes. Same for the front where it runs underneath the crossmember. I was also concerned with the brake line where it ran through a gusset or something, so I covered those areas with vacuum hose which is not reinforced like the fuel hose and then covered the hose with heat shrink. It looks better, it holds the piece of hose in place, and I now do not have to worry about a line rubbing against the steel brackets or gussets. If given enough time to rub, only one thing could eventually happen. |
The engine
This is a 390 out of a 66' Fairlane GT. It has been in a 1976 F100 truck for awhile, but the truck is getting a rebuilt 351W. The engine was just pulled here as you can see by the antifreeze in the lifter valley and in the water jackets. The block, heads, and crank will go to the machine shop for some time in the hot tank and whatever machine work needs to be done. It will be somewhat of a mild build, but even at a conservative 335 horsepower rating in stock form, it should already be fun in a 2600# car- with a 90" wheelbase. It of course is not a 427, but it IS an "FE" engine, so it will look authentic to the un-trained eye...and it will still have that big block sound! |
|
|
|
Cleaning and painting...
Here is the factory bellhousing after wire brushing and grinding it to clean it up and smooth it out. It was then painted dark Ford blue and the inside painted with POR-15 to keep the rust away. I am still undecided on exactly what I am going to use and what will be replaced, so I am cleaning everything up and painting it. For example, I plan to go with Edelbrock aluminum heads, but if I do, the original heads will be complete and ready for something else. Also undecided is scatter shield and aftermarket oil pan. There are many things that would look great, but sometimes functionality is the deciding factor. |
A few more things
Heres a few more things cleaned up and painted. I am not sure if I will use the stock oil pan, or even the stock bellhousing, but I am just cleaning everything up to be painted as if it's not used on the Cobra, they will be put on the shelf in the garage for something else. Heres the oil pan, coil bracket, dip stick, alternator brackets, crankshaft collar, etc., after being painted. After the paint cured, they were then all clearcoated. I am now in the process of polishing the timing cover which will be clear coated as well. |
|
|
|
Rear Brakes
Here you can see the backing plate and brake shoes. The brakes are actually Ford SVT brakes, which uses a brake rotor with the back side machined as well to accept brake shoes like drum brakes. This is for the emergency brake only, as the actual rear brakes are disc brakes. I have the caliper on only to see how they will look, as I still need to have the axle bearings pressed onto the axles. Then I can fully assemble them with the brake pads. Also, like the front brakes, the rear calipers were painted Sterling Silver then given two coats of clear. The rotors, other than the machined surface, was painted with POR-15 black to protect them from rust and to make them look better. Its alot of extra work for something that wont be seen, but it's more functional than cosmetic. |
The brake rotor...or drum?
Here is a back view of the rotor with the machined surface for the drum brake shoes. Its a pretty slick set-up, and the Cobra now has 11" rotors on all four corners. The rear calipers are not nearly as meaty as the fronts- which have a 2.75" piston to provide the stopping power...but they should be more than ample, as again, the completed car will weigh approximately 2600 lbs..
|
|
|
|
Wait...Back up a little
Before the brakes are installed, the axles of course have to be secured in place. I got home from the machine shop after having the bearings and spacers pressed onto the axles, and went straight to the garage. I was looking forward to a three day weekend from work, and planned to have the brakes fully assembled by Sunday. Upon test fitting the axles, I found that the left axle was a bit too long. I need to trim about 3/16" from the end of the axle, which basically put a stop to me getting anything done...then I couldn't get the axle back out. After renting an axle puller, I had the axle out in no time. I checked the axle once again to be sure, and yes- it needs cut down. To make a long story short, I had to use the axle puller several more times. I figured I could go ahead and get the right side completed, and then ran into trouble getting the spacer in place while tightening the 4 flange bolts. The third member now is open, and needs to be replaced with a limited slip. I got to thinking about taking the brakes and axles off later to remove the third member, and decided to stop right there. I removed the 10 bolts from the housing and removed the third member. I will probably leave the 3.50 gears in there, but the brakes will not be completed til the new third member is in place. That way, once it's done- it's done! |
Brake line clamp
I decided to replace the rubber type brake lines with stainless lines. Shell Valley welded a 90 degree clamp with the round hole on the front of the chassis, in which the brake line passes through and is secured with the clamp that slides on over the brake line. The new stainless lines do not have the large round ends on them, so I had to fabricate two clamps, one for each side. I used steel stock, 1/2" wide and 1/8" thick. I cut two pieces, and bent them to 90 degrees. This piece will be bolted to the frame itself. Then I made two smaller pieces and bent them so that they will go over the brake line, thus holding it to the bracket. here is the bracket from one side. I still need to clean them up a bit with the grinder, paint them with POR-15, and bolt them to the frame. Then I can secure the smaller piece to the bracket which will hold the line in place. |
|
|
|
4 Speed Toploader
Up to this point, one thing I thought I had pretty much decided on was a transmission, which was to be a Tremec. I figured if I ran across a good deal on a toploader, I definately would consider it. My dad and I went to an all Ford swap meet over the weekend, and I was amazed at how many were there. I looked at T-10's, toploaders, etc., and learned a bit about them, or at least what to look for. After hearing i'd need a short tailhousing, preferrably with the shifter mount location in the middle of the tailhousing- not all the way back at the end, etc.. It was then somewhat discouraging, as now it seemed like everyone I found was not exactly what I need. I finally found one with the correct housing, shifter in the right spot, and with the right pilot. We took the cover off, and it was all rusted up. Just when I was about to give up, and about an hour before the swap meet closed, I found this one. Turns out the guy lives pretty close, everything that could be inspected looked great, and it didnt look like it had been messed with like a few I seen with a bunch of different bolts and things like that. |
There was another guy talking to us that builds toploaders and was pointing to things on other transmissions. He looked at this one and said he of course could not see the bearings, but everything else looked great. Between his advice and just talking to the owner for some time, I figured it was a safe buy. I got it home and looked up the numbers. It is a RUG-M2 case, which is from a 1967 or 1968 390 Mustang. But something thats interesting is that I know there are alot of crazy changes, exceptions, etc. to Ford's numbering game. There is also a number stamped on top of the flange, drivers side, just behind where the bellhousing mounts. Supposedly, these "extra" numbers were only on Boss, Cobra Jets, Super Cobra Jets, and Machs. 69 was the first year for Boss Mustangs, the only CJ and SCJ's I know of are 428's, and 1969 is also the first year for the Mach 1 Mustangs...none of which would seem to apply to a 67 or 68 Mustang, especially with a 390 FE. What does it mean? I have no idea whatsoever, but the extra set of numbers cant be bad. LOL Anyway, the cool thing is the Cobra will have a toploader 4 speed like the originals, 3.50 rear gears as compared to the 3.54's (Ford also used I think 3.31's), and although the Cobra will be powered by a 390, as for horsepower rating, it will be pretty close to the originals too.
|
|
|


